Onboarding guide
The below integration guide provides information about implementing Exposebox on your website. Integration is the first step for data exchange. The step-by-step guide will walk you through the needed steps and scripts.
Table of content
Onboarding wizard - General info and events overview
Once logged in to your Exposebox account, a setup wizard will be displayed.
Steps to access the onboarding wizard:
- Go to https://my.exposebox.com/v3/
- Insert your account credentials.
- The onboarding wizard will be displayed.

The onboarding wizard is composed of 3 parts:
- General info – inserting information about your website.
- Events – the list of required events to implement on your website.
- Product catalog – set up a product catalog feed. Configuring the product catalog will allow Exposebox to access your most updated product catalog.
You can access the setup from the setup wizard and also from the settings screen. If you wish to exit the setup, you can return to it at any time by clicking the setting icon on the right-hand side of the main screen of the dashboard:

General info
As a first step, we need to know basic information about your site:
- Site label – Insert your company/site’s name
- URL – Insert your website URL
- Site logo – Fetch site logo – your logo will be automatically fetched from your website and displayed on the email & SMS unsubscribed page. We support png/jpg formats.
- Currency – Select your store currency.
- Time zone – Select your preferred time zone. The system will use the time zone definition when sending emails and/or SMSs. The system will deliver emails and SMS based on the selected time zone.

Events
Implementing the Exposebox script will allow Exposebox to track and analyze users’ behavior on your website, i.e view product, click on a product, etc.
The events section includes the following:
- Overview of the required events to implement.
- Validating the implementations of the script.
Exposebox’s scripts and details are displayed in the Events page section of the dashboard’s setup wizard.

Exposebox scripts include the following events:
This script needs to be added to every website page regardless of integration type and the information transferred. We recommend implementing the basic script at theof all your webpages.
The script loads asynchronously; and, it won’t affect the page loading time or the user experience.
Additionally, we recommend the script on every future page template so that all future pages on your website will include the script to run the ExposeBox actionable data.
Below, you will find the code snippets for the implementation, with detailed explanations and examples in the following steps.
<script>
var companyId = 123456789;//Replace with your actual Company ID provided by Exposebox.
var script = document.createElement(“script”); script.type = “text/javascript”; script.async = true; script.src = “https://sf.Exposebox.com/widget/predictl.min.js?c=” + companyId; //http(s): protocol depends on your website document.getElementsByTagName(“head”)[0].appendChild(script); window.predictlApi = window.predictlApi || function (cb) { var pa = window.predictlApi; pa.or = pa.or || []; pa.or.push(cb); }
</script>
Note: Replace the variable value with the CompanyID provided by Exposebox.
The following script reports to Exposebox that visitors to your website viewed a specific product. Integrate the script on every product page.
The product event should send Exposebox the product ID of the product page the visitor is viewing.
Below, there is a general example of the product event. Replace the product-id string with the actual product ID of the product page.
The product ID you send in the product events has to be the same product ID you have provided in the product feed.
window.predictlApi(function () {
window.predictlApi.setProducts([‘product-id‘]);
//replace the product-id string with the actual product-id
});
In case that page contains multiple variants, the product event should use an array of their product IDs:
window.predictlApi(function () {
window.predictlApi.setProducts([“variant-1”,“variant-2”,“variant-3”]);
});
This event reports to Exposebox the categories’ breadcrumbs users are viewing. Implement the category page event on all your category pages. This event is required.
The categories breadcrumbs sent in the event have to match the categories provided in the product catalog feed.
The category array order goes from the top category to the lowest category.
Example:
window.predictlApi(function () {
window.predictlApi.setCategories([‘electronics’,‘tv’,’oled_televisions’]);
});
The ‘Add to Cart’ event reports when users added products to their carts.
The event includes:
- productID – the ID of the product that is added to the cart.
- Quantity – the number of items of the product that were added to cart.
- Unit price – the unit price of the item added to cart.
Example:
window.predictlApi(function () {
var productId = “12345”;
var quantity = 3;
var unitPrice= 40.00;
window.predictlApi.events.addToCart(productId, quantity,unitPrice);
});
The ‘Remove from cart’ event reports when a user has removed a product from their cart. In case a user removes 3 items from their cart in one action, make sure to send in the quantity variable the number of items removed.
window.predictlApi(function () {
var productId = “p34212332”;
var quantity = 3;
window.predictlApi.events.removeFromCart(productId, quantity);
});
Add to Cart and Remove from Cart events example:
Scenario:
- A user added three items to cart ( event= “add 3”)
- Then the user removed two items from the cart ( event= “remove 2”)
- Then the user added an additional item to cart ( event= “add 1”)
For this scenario, you will need to send us the following events:
Add to cart:
window.predictlApi(function () {
var productId = “p34444”;
var quantity = 3;
var unitPrice= 76.50;
window.predictlApi.events.addToCart(productId, quantity,unitPrice); }
);
Remove from cart:
window.predictlApi(function (){
var productId = “p34444”;
var quantity = 2;
window.predictlApi.events.removeFromCart(productId, quantity);
});
Add to cart:
window.predictlApi(function () {
var productId = “p34444”;
var quantity = 1;
var unitPrice= 76.50;
window.predictlApi.events.addToCart(productId, quantity,unitPrice); }
);
The purchase event reports to Exposebox the purchase information a user completed. The event needs to be sent after the user completes their purchase at the ‘Thank You’ page.
The event includes the following variables –
- order ID – purchase order number
- total price – the total price of all the purchased products- the total needs to be the amount paid by the customer deducting discounts, coupons, and delivery fees.
- cart products – purchased products, quantity, and unit price.
Example:
window.predictlApi(function () {
var orderId = “order-45215”; // Store order id
var totalPrice = 254;// Order total price after discounts, coupons and delivery.
var cartProducts = [
{productId: “p34212332”,quantity: 2, unitPrice: 43.00},
{productId: “p34212345”,quantity: 3, unitPrice: 56.00}
];
predictlApi.events.conversion(cartProducts, orderId, totalPrice);
});
In order to collect customers’ information, the customer event should be implemented. This script is also required in order to send emails and SMS messages.
Please implement this event in the following scenarios:
- Users complete the sign-up process.
- Users log in to your website.
- Users who checked out and confirmed to receive marketing material (subscribed).
The event includes the following fields:
- customerId – mandatory field.
- firstName
- lastName
- phone
- address1
- address2
- city
- country
- zipCode
- freeData
- subscribedUserLists – mandatory when a user agrees to receive marketing materials (emails and SMS messages).
- unsubscribedUserLists
- Customer ID– the customer ID from your system. If you don’t have one, an email address can be used as the customer identifier; meaning the CustomerID will be the email address. The customer ID field is mandatory. All other fields are optional.
- freeData – free data field allows you to provide any additional customer information you would like to use. For example (date of birth, club membership, branch, etc).
- subscribedUserLists – this field is required in order to add the user to the marketing user list. Please add this code in the setCustomerData event only if the user opted-in marketing materials, otherwise don’t include it.
- unsubscribedUserLists – Include this code in the setCustomerData event only if the user wishes to unsubscribe in the website’s personal account section.
Example of customer event when the user agrees to receive marketing materials:
window.predictlApi(function () {
window.predictlApi.setCustomerData({
customerId: ‘123456’, //the customer ID as defined in your systems
email: ‘testing@exposebox.com’,
name: ‘John’,
lastName: ‘Snow’,
phone: ‘540542643454’, //phone can be sent with “-” separators and without
freeData: { //allow you to send us any extra information about the user
Gender: ‘Male’,
DateOfBirth:‘1992-12-24’,
ClubMembershipEndDate: ‘2022-01-05’
}
subscribedUserLists:[‘master-email’,’master-sms’] //send us subscribedUserLists command only if the user agreed to receive marketing materials, otherwise omit this command.
})
});
Example of customer event when the user does not agrees to receive marketing materials:
window.predictlApi(function () {
window.predictlApi.setCustomerData({
customerId: ‘123456’, //the customer ID as defined in your systems
email: ‘testing@exposebox.com’,
name: ‘John’,
lastName: ‘Snow’,
phone: ‘540542643454’, //phone can be sent with “-” seperators and without
freeData: { //allow you to send us any extra information about the user
Gender: ‘Male’,
DateOfBirth:‘1992-12-24’,
ClubMembershipEndDate: ‘2022-01-05’
}
})
});
Example of customer event for registered users during checkout:
window.predictlApi(function () {
window.predictlApi.setCustomerData({
customerId: ‘123456’, //the customer ID as defined in your systems
email: ‘testing@exposebox.com‘,
name: ‘John’,
lastName: ‘Snow’,
phone: ‘540542643454’, //phone can be sent with “-” separators and without
freeData: { //allow you to send us any extra information about the user
Gender: ‘Male’,
DateOfBirth:‘1992-12-24’,
ClubMembershipEndDate: ‘2022-01-05’
}
subscribedUserLists:[‘master-email’,’master-sms’] //send us subscribedUserLists command only if the user agreed to receive marketing materials, otherwise omit this command.
})
});
Example of customer event on a user wishes to unsubscribe in the website’s personal account section:
window.predictlApi(function () {
window.predictlApi.setCustomerData({
customerId: ‘123456’, //the customer ID as defined in your systems
email: ‘testing@exposebox.com‘
unsubscribedUserLists:[‘master-email’,’master-sms’] //send us subscribedUserLists command only if the user agreed to receive marketing materials, otherwise omit this command.
})
});
Implement this event only if you would like to show product recommendations on the search and filter page.
Adding the search and filter tags allows Exposebox to identify current user interests and optimize the recommended products. This event should be sent when users search or filter based on their shopping preferences.
In the example below, a user searched for “Men winter coats” and filtered the results by category, min prices, and fabric type.
Example of a search event for query:
window.predictlApi(function () {
var products = [‘p34212332’,‘p3426678’,‘p3426888′,’p31426648′,’p2426831′,’p5826888’];
//Top 6 product results of the query
window.predictlApi.events.sendEvent(“searchAndFilter”,{
products: products,
query: ‘Men winter coats’, //The search query products
});
});
Example of a filtered event based on the filtered parameters:
window.predictlApi(function () {
var products = [‘p34212332’,‘p3426678’,‘p3426888′,’p31426648′,’p2426831′,’p5826888’];//Top 6 product results of the query
window.predictlApi.events.sendEvent(“searchAndFilter”,{
products: products,
//All the search parameters filtered by the user
categories: [‘Men’,‘Coats’],
minPrice: 11.0,
maxPrice: 51.0,
fabric: [‘tweed’,‘wool’]
});
});
The event needs to be sent once the customer clicks on the checkout button or when the checkout page loads.
window.predictlApi(function () {
window.predictlApi.events.sendEvent(‘checkout’,{type:‘cartPage’});
});
In case your checkout process is built from several steps, please send a different event, for every checkout page.
For example, if your checkout process has the following three pages:
- Cart page
- Customer details
- Insert more customers details
You will need to send checkout events with multiple checkout types, for example:
Cart page
window.predictlApi(function () {
window.predictlApi.events.sendEvent(‘checkout’,{type:‘cartPage’});
});
Customer details
window.predictlApi(function () {
window.predictlApi.events.sendEvent(‘checkout’,{type:‘customer_details’});
});
More details page
window.predictlApi(function () {
window.predictlApi.events.sendEvent(‘checkout’,{type:‘more_details’});
});
Segmentation tags allow you to segment users based on customized attributes, which you can later group to specific audiences. When creating product recommendations and email campaigns, you can use these audience-based segments.
- The segmentation tag contains a key-value pair that you define based on your marketing/business agenda.
- Segmentation tags must be defined prior to integration.
Example: An article page with the keyword ‘Hobbies’ and contains values such as ‘knitting’ or ‘gardening’ will enable you to create audience groups sharing an interest in knitting or gardening.
window.predictlApi(function () {
var tags = {
hobbies:[‘knitting’,‘gardening’],
priceRange: [‘0-100’]
};
window.predictlApi.setTags(tags);
});
*Exposebox platform allows you to segment users without the need to implement the script above. The script above is an alternative way to allow you to segment users.
The wishlist events allow Exposebox to know when users added or removed an item from their wishlist.
Add to wishlist
window.predictlApi(function () {
var productId = ‘p34212332’;
window.predictlApi.events.addToWishlist(productId);
});
Remove from wishlist
window.predictlApi(function () {
var productId = ‘p34212332’;
window.predictlApi.events.removeFromWishlist(productId);
});
Validating events implementation
The validation of the implementation should be done only after configuring the product feed in our platform.
Validating the events includes two parts:
- Validating that events were successfully received by Exposebox
- Validating that Exposebox processed the events successfully.
Validating that events were successfully received by Exposebox. In order to validate that the scripts are implemented as required, go to Settings -> Events, you will see a list of the events.
A green icon will be displayed next to every event we received successfully.

Validating that Exposebox processed the events successfully
In this section please check that the events are valid and processed successfully by the platform.
On the events page, scroll down to the ‘Event List’ section.
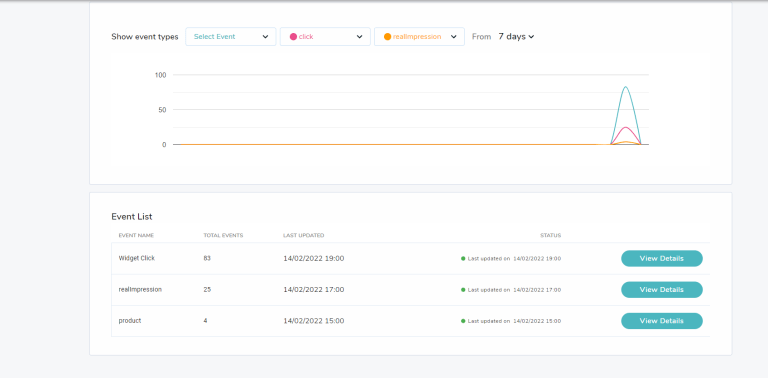
In the example above, you can see that in the last seven days, 324,110 product events were sent and processed successfully.
- A green button in the Status column next to the date indicates that the events are received and processed by the platform.
- A yellow button indicates that events were partially processed successfully.
- A red button indicates that all the events were not processed successfully.
To view more information about the events you sent, click on the ‘View Details’ button.
- The screen displays the last 100 received events of this event type.
- The number of received events by domain for the selected event type.

Product catalog (feed)
A product feed is required to allow Exposbox to receive your up-to-date products. Our onsite product recommendation widget and personalized emails use this data when displaying your products.
Exposebox platform will access the URL you provide us. It will read your product catalog at the predetermined frequency you will set, and update our database with your latest product updates
The product feed configuration requires setting up the following parameters:
We support the following file types:
- CSV
- TSV
- SSV
- XML
The platform will access your feed based on the predetermined frequency:
- Every 4 hours
- Every 8 hours
- Every 12 hours
- Once a day
Add your feed URL. The provided URL should not be protected by username and password.
Exposebox feed format
In the following section, we will specify requirements to create the Exposebox feed format.
Example for Exposebox CSV feed file:
Example for Exposebox XML feed file:
https://storage.googleapis.com/ex-tmp/ProductFeedImporter/Exposebox%20-%20feed%20-%20%20XML.xml
The feed should contain the following fields:
Name | Type | Mandatory/Optional | Description |
id | String | Man. | Your product ID is a unique identifier for your products in the system. |
item_group_id | String | Opt. |
E.g., a shirt with various colors and sizes (all of those variants will have the same item GroupID). |
title | String | Man. | Product name |
price | Decimal | Man. | Product price |
sale_open | Boolean / (TRUE or FALSE) | Man. | Your product’s availability. If you don’t want a product to be recommended, set it as 0 or FALSE. |
url | String | Man. | Product page URL |
image_url | String | Man. | Product image URL |
supplier_id | String | opt. | SupplierID determined by the marketplace |
catalog_id | String | Opt. | A product catalog (typically the highest classification/categorization of products). For example, one feed will contain two different catalogs – products and blog articles. |
category | String/Array of strings/ Strings separated by “>” | Man. | The category must match the category’s breadcrumbs sent in the category events. The array should represent the breadcrumbs / categories path leads to a specific product. The order in the array will be from the category at the lowest level of filtering to the highest level (the latter category will be last). For example: [“Clothing”,”Unisex T-Shirts and Tops”] or Electronics > Televisions > OLED TVs > Samsung Oled TV. If the category is only one level, please send the category as a string. Example For XML: <category>Electronics > Televisions > OLED TVs > Samsung Oled TV</category> |
on_sale | Boolean | Opt. | Is the product currently discounted or on sale. |
description | String | Opt. | Product description |
brand | String | Opt. | Product brand |
currency | String | Opt. | Currency |
original_price | String | Opt. | Original price of product |
free_data | JSON/ Object | Opt. | Any additional data that is not part of Exposebox default fields mentioned above can be added to free_data field as a JSON object. An additional way to include more data is to add columns to the feed. In this method, the platform will automatically import the extra columns to the free data field. For reference please see CSV feed file example below: https://storage.googleapis.com/ex-tmp/ProductFeedImporter/ExposeBox%20feed%20example%20-%20for%20Onboarding.csv |
tags | tag element | Opt. | Product tags. Similar to category field, without a hierarchy. Example for XML file: <tags> </tags> |
Once the feed is processed, you will be able to see the feed importing process results in the Product catalog setup screen where you previously configured your feed.

In case the platform encounters issues importing the feed or some of the products due to incorrect data fields or format issues, a View Errors button will be displayed to review the issues and fix the product catalog.

HTML required design for onsite product recommendation
When creating an onsite product recommendation campaign, you can use Exposebox pre-sets design templates or use an HTML design you provide.
Our platform doesn’t have any restrictions about the HTML design you provide. Typically, the product recommendation design will include a product title, product description, price, but it can include any information you desire to display and you provide us in the product feed catalog.
Email campaigns - DNS configuration
In order to send emails from the platform, the following steps are required:
- Define your subdomain for email delivery. For example marketing.exposebox.com. Email address is composed of two parts: local-part and subdomain: local_part@subdomain. For example adam@marketing.exposebox.com. This is the domain name that will be used when sending emails.
- Share your subdomain name with Exposebox. Once the subdomain is received, Exposebox will create the requested subdomain on our platform.
- Exposebox will send you a DNS configuration you are required to set up on your end.
- Once you complete the DNS configuration please update Exposebox so we can verify that your configuration was done properly
SMS campaigns
SMS configuration is done by Exposebox. Please inform your contact person if you would like to send promotional and automated SMS messages.
Need help?
Contact us today